m (changing various links Project:Bot requests) |
|||
| (15 intermediate revisions by 9 users not shown) | |||
| Line 1: | Line 1: | ||
| − | {{RoutesPrevNext | prev=Route 201 | next=Route 203 }} |
+ | {{RoutesPrevNext | prev=Route 201 | next=Route 203 | region1=Sinnoh | region2=Sinnoh }} |
'''Route 202''' is north of [[Sandgem Town]] and south of [[Jubilife City]]. At this route, players will encounter their first battle against Trainers. |
'''Route 202''' is north of [[Sandgem Town]] and south of [[Jubilife City]]. At this route, players will encounter their first battle against Trainers. |
||
| Line 7: | Line 7: | ||
The higher the percentage, the higher the chance for the Pokémon to appear. |
The higher the percentage, the higher the chance for the Pokémon to appear. |
||
| − | {|border="1" |
+ | {| border="1" style= "text-align:center;" |
| − | !colspan=" |
+ | !colspan="8" style="background-color:#ADD8E6; color:#000000;"|Pokémon Diamond/Pearl |
|- |
|- |
||
| − | + | !colspan="1" style="background-color:#ADD8E6; color:#000000;"|Location |
|
| − | + | !colspan="4" style="background-color:#ADD8E6; color:#000000;"|Grass |
|
| − | + | !colspan="1" style="background-color:#ADD8E6; color:#000000;"|Swarm |
|
| − | + | !colspan="1" style="background-color:#ADD8E6; color:#000000;"|Pokémon Radar |
|
| − | + | !colspan="1" style="background-color:#ADD8E6; color:#000000;"|FireRed |
|
|- |
|- |
||
| + | |Sprites |
||
| − | |[[Starly]] |
||
| + | |[[File:DiamondPearlBidoof(M).png]] |
||
| − | |30% |
||
| + | |[[File:DiamondPearlStarly(M).png]] |
||
| − | |40% |
||
| + | |[[File:Shinx.png]] |
||
| − | |20% |
||
| + | |[[File:DiamondPearlKricketot(M).png]] |
||
| − | |Grass |
||
| + | |[[File:DiamondPearlZigzagoon.png]] |
||
| + | |[[File:DiamondPearlSentret.png]] |
||
| + | |[[File:DiamondPearlGrowlithe.png]] |
||
|- |
|- |
||
| + | |Pokémon |
||
|[[Bidoof]] |
|[[Bidoof]] |
||
| + | |[[Starly]] |
||
| + | |[[Shinx]] |
||
| + | |[[Kricketot]] |
||
| + | |[[Zigzagoon]] |
||
| + | |[[Sentret]] |
||
| + | |[[Growlithe]] |
||
| + | |- |
||
| + | |type 1 |
||
| + | |[[Pokémon types#Normal-type|Normal]] |
||
| + | |[[Pokémon types#Normal-type|Normal]] |
||
| + | |[[Pokémon types#Electric-type|Electric]] |
||
| + | |[[Pokémon types#Bug-type|Bug]] |
||
| + | |[[Pokémon types#Normal-type|Normal]] |
||
| + | |[[Pokémon types#Normal-type|Normal]] |
||
| + | |[[Pokémon types#Fire-type|Fire]] |
||
| + | |- |
||
| + | |type 2 |
||
| + | | - |
||
| + | |[[Pokémon types#Flying-type|Flying]] |
||
| + | | - |
||
| + | | - |
||
| + | | - |
||
| + | | - |
||
| + | | - |
||
| + | |- |
||
| + | |Morning |
||
|30% |
|30% |
||
|30% |
|30% |
||
|30% |
|30% |
||
| + | |10% |
||
| − | |Grass |
||
| + | |40% |
||
| + | |22% |
||
| + | |8% |
||
|- |
|- |
||
| + | |Day |
||
| − | |[[Shinx]] |
||
|30% |
|30% |
||
| + | |40% |
||
|30% |
|30% |
||
| + | | - |
||
| + | |40% |
||
| + | |22% |
||
| + | |8% |
||
| + | |- |
||
| + | |Night |
||
| + | |30% |
||
| + | |20% |
||
|30% |
|30% |
||
| − | |Grass |
||
| − | |- |
||
| − | |[[Kricketot]] |
||
| − | |10% |
||
| − | |0% |
||
|20% |
|20% |
||
| − | |Grass |
||
| − | |- |
||
| − | |[[Zigzagoon]] |
||
|40% |
|40% |
||
| − | |40% |
||
| − | |40% |
||
| − | |Swarm |
||
| − | |- |
||
| − | |[[Sentret]] |
||
|22% |
|22% |
||
| − | |22% |
||
| − | |22% |
||
| − | |Pokémon Radar |
||
| − | |- |
||
| − | |[[Growlithe]] |
||
| − | |8% |
||
| − | |8% |
||
|8% |
|8% |
||
| − | |Pokémon FireRed inserted |
||
|- |
|- |
||
| − | !colspan=" |
+ | !colspan="8" style="background-color:#808080; color:#000000;"|Pokémon Platinum |
|- |
|- |
||
| − | + | !colspan="1" style="background-color:#808080; color:#000000;"|Location |
|
| − | + | !colspan="3" style="background-color:#808080; color:#000000;"|Grass |
|
| − | + | !colspan="2" style="background-color:#808080; color:#000000;"|Pokémon Radar |
|
| − | + | !colspan="1" style="background-color:#808080; color:#000000;"|Swarm |
|
| − | + | !colspan="1" style="background-color:#808080; color:#000000;"|FireRed |
|
|- |
|- |
||
| + | |Sprites |
||
| − | |[[Starly]] |
||
| + | |[[File:DiamondPearlBidoof(M).png]] |
||
| − | |30% |
||
| + | |[[File:DiamondPearlStarly(M).png]] |
||
| − | |40% |
||
| + | |[[File:Shinx.png]] |
||
| − | |20% |
||
| + | |[[File:DiamondPearlKricketot(M).png]] |
||
| − | |Grass |
||
| + | |[[File:DiamondPearlZigzagoon.png]] |
||
| + | |[[File:DiamondPearlSentret.png]] |
||
| + | |[[File:DiamondPearlGrowlithe.png]] |
||
|- |
|- |
||
| + | |Pokémon |
||
|[[Bidoof]] |
|[[Bidoof]] |
||
| + | |[[Starly]] |
||
| − | |30% |
||
| − | |30% |
||
| − | |30% |
||
| − | |Grass |
||
| − | |- |
||
|[[Shinx]] |
|[[Shinx]] |
||
| − | |30% |
||
| − | |30% |
||
| − | |30% |
||
| − | |Grass |
||
| − | |- |
||
|[[Kricketot]] |
|[[Kricketot]] |
||
| − | |10% |
||
| − | |0% |
||
| − | |20% |
||
| − | |Grass |
||
| − | |- |
||
|[[Zigzagoon]] |
|[[Zigzagoon]] |
||
| − | |40% |
||
| − | |40% |
||
| − | |40% |
||
| − | |Swarm |
||
| − | |- |
||
|[[Sentret]] |
|[[Sentret]] |
||
| − | |22% |
||
| − | |22% |
||
| − | |22% |
||
| − | |Pokémon Radar |
||
| − | |- |
||
|[[Growlithe]] |
|[[Growlithe]] |
||
| − | |8% |
||
| − | |8% |
||
| − | |8% |
||
| − | |Pokémon FireRed inserted |
||
|- |
|- |
||
| + | |type 1 |
||
| − | !colspan="5" style="background-color:#808080; color:#FFFFFF;"|Pokémon Platinum |
||
| + | |[[Pokémon types#Normal-type|Normal]] |
||
| + | |[[Pokémon types#Normal-type|Normal]] |
||
| + | |[[Pokémon types#Electric-type|Electric]] |
||
| + | |[[Pokémon types#Bug-type|Bug]] |
||
| + | |[[Pokémon types#Normal-type|Normal]] |
||
| + | |[[Pokémon types#Normal-type|Normal]] |
||
| + | |[[Pokémon types#Fire-type|Fire]] |
||
|- |
|- |
||
| + | |type 2 |
||
| − | |style="background-color: #808080; color:#FFFFFF;"|'''Pokémon''' |
||
| + | | - |
||
| − | |style="background-color: #808080; color:#FFFFFF;"|'''Morning''' |
||
| + | |[[Pokémon types#Flying-type|Flying]] |
||
| − | |style="background-color: #808080; color:#FFFFFF;"|'''Day''' |
||
| + | | - |
||
| − | |style="background-color: #808080; color:#FFFFFF;"|'''Night''' |
||
| + | | - |
||
| − | |style="background-color: #808080; color:#FFFFFF;"|'''Method''' |
||
| + | | - |
||
| + | | - |
||
| + | | - |
||
|- |
|- |
||
| + | |Morning |
||
| − | |[[Starly]] |
||
| + | |40% |
||
|20% |
|20% |
||
| + | |30% |
||
| + | |10% |
||
| + | |40% |
||
| + | |12% |
||
| + | |8% |
||
| + | |- |
||
| + | |Day |
||
| + | |50% |
||
|30% |
|30% |
||
|20% |
|20% |
||
| + | | - |
||
| − | |Grass |
||
| + | |40% |
||
| + | |12% |
||
| + | |8% |
||
|- |
|- |
||
| + | |Night |
||
| − | |[[Bidoof]] |
||
| − | |40% |
||
|50% |
|50% |
||
| − | |50% |
||
| − | |Grass |
||
| − | |- |
||
| − | |[[Shinx]] |
||
| − | |30% |
||
|20% |
|20% |
||
|20% |
|20% |
||
| − | |Grass |
||
| − | |- |
||
| − | |[[Kricketot]] |
||
|10% |
|10% |
||
| − | |0% |
||
| − | |10% |
||
| − | |Grass |
||
| − | |- |
||
| − | |[[Zigzagoon]] |
||
|40% |
|40% |
||
| − | |40% |
||
| − | |40% |
||
| − | |Swarm |
||
| − | |- |
||
| − | |[[Sentret]] |
||
|12% |
|12% |
||
| − | | |
+ | |8% |
| − | |12% |
||
| − | |Pokémon Radar |
||
|- |
|- |
||
| + | !colspan="1" style="background-color:#808080; color:#000000;"|Location |
||
| − | |[[Growlithe]] |
||
| + | !colspan="1" style="background-color:#808080; color:#000000;"|Ruby |
||
| + | !colspan="1" style="background-color:#808080; color:#000000;"|Sapphire |
||
| + | !colspan="5" style="background-color:#808080; color:#000000;"| - |
||
| + | |- |
||
| + | |Sprites |
||
| + | |[[File:DiamondPearlSeedot.png]] |
||
| + | |[[File:DiamondPearlLotad.png]] |
||
| + | | |
||
| + | | |
||
| + | | |
||
| + | | |
||
| + | | |
||
| + | |- |
||
| + | |Pokémon |
||
| + | |[[Seedot]] |
||
| + | |[[Lotad]] |
||
| + | | |
||
| + | | |
||
| + | | |
||
| + | | |
||
| + | | |
||
| + | |- |
||
| + | |type 1 |
||
| + | |[[Pokémon types#Grass-type|Grass]] |
||
| + | |[[Pokémon types#Grass-type|Grass]] |
||
| + | | |
||
| + | | |
||
| + | | |
||
| + | | |
||
| + | | |
||
| + | |- |
||
| + | |type 2 |
||
| + | | - |
||
| + | | [[Pokémon types#Water-type|Water]] |
||
| + | | |
||
| + | | |
||
| + | | |
||
| + | | |
||
| + | | |
||
| + | |- |
||
| + | |Morning |
||
|8% |
|8% |
||
|8% |
|8% |
||
| − | | |
+ | | |
| + | | |
||
| − | |Pokémon FireRed inserted |
||
| + | | |
||
| + | | |
||
| + | | |
||
|- |
|- |
||
| + | |Day |
||
| − | |[[Seedot]] |
||
|8% |
|8% |
||
|8% |
|8% |
||
| − | | |
+ | | |
| + | | |
||
| − | |Pokémon Ruby inserted |
||
| + | | |
||
| + | | |
||
| + | | |
||
|- |
|- |
||
| + | |Night |
||
| − | |[[Lotad]] |
||
| − | |8% |
||
|8% |
|8% |
||
|8% |
|8% |
||
| + | | |
||
| − | |Pokémon Sapphire inserted |
||
| + | | |
||
| + | | |
||
| + | | |
||
| + | | |
||
|} |
|} |
||
| − | |||
==Items== |
==Items== |
||
| Line 227: | Line 274: | ||
{| border="1" style= "text-align:center;" |
{| border="1" style= "text-align:center;" |
||
| − | !colspan="1" style="background-color:#FFFF00; color:#000000;"|Youngster |
+ | !colspan="1" style="background-color:#FFFF00; color:#000000;"|Youngster Logan |
|- |
|- |
||
| [[File:Shinx.png]] |
| [[File:Shinx.png]] |
||
| Line 244: | Line 291: | ||
===Catching a Pokémon=== |
===Catching a Pokémon=== |
||
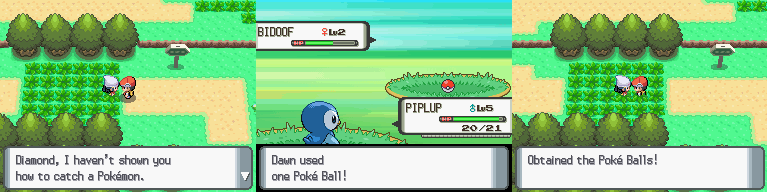
| − | After you told your Mum about your adventure, head to Route 202 and Dawn/Lucas will teach you how to catch a Pokémon. After that, he/she will give you 5 [[Poké Ball |
+ | After you told your Mum about your adventure, head to Route 202 and Dawn/Lucas will teach you how to catch a Pokémon. After that, he/she will give you 5 [[Poké Ball]]s for free. You can now catch your favourite Pokémon and start collecting it to make a strong team! |
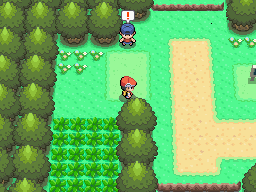
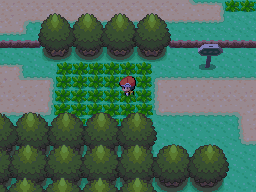
[[File:Diamond-Pearl_Route_202_1.png]] |
[[File:Diamond-Pearl_Route_202_1.png]] |
||
| Line 260: | Line 307: | ||
[[File:Diamond-Pearl_Route_202_2.png]] |
[[File:Diamond-Pearl_Route_202_2.png]] |
||
| − | == |
+ | ==Quick Walkthrough== |
| + | |||
'''Route 202''' → [[Jubilife City]] → [[Route 203]] → [[Oreburgh Gate]] → [[Oreburgh City]] → [[Oreburgh Mine]] → ... |
'''Route 202''' → [[Jubilife City]] → [[Route 203]] → [[Oreburgh Gate]] → [[Oreburgh City]] → [[Oreburgh Mine]] → ... |
||
| + | |||
| − | [[Category:Routes]] |
||
| + | {{Sinnoh}} |
||
| + | |||
| + | [[es:Ruta 202]] |
||
[[Category:Sinnoh Routes]] |
[[Category:Sinnoh Routes]] |
||
Revision as of 01:13, 30 November 2014
| ← Route 201 (Sinnoh) | Routes | Route 203 (Sinnoh) → |
Route 202 is north of Sandgem Town and south of Jubilife City. At this route, players will encounter their first battle against Trainers.
Pokémon Appearances
The higher the percentage, the higher the chance for the Pokémon to appear.
.png)
.png)
.png)
Items
| Item | Amount | Location |
| Potion | 1 | Grass patch at northwest. |
Trainers
Youngster Tristan
| Youngster Tristan |
|---|
| File:Starly(P)SpriteMale.png |
| Starly ♂ |
| Lv. 5 |
| Normal |
| Flying |
| Money: 80 |
SpriteMale.png)
Lass Natalie
| Lass Natalie | |
|---|---|
| File:PlatinumBidoof(F).png | File:PlatinumBidoof(F).png |
| Bidoof ♀ | Bidoof ♀ |
| Lv. 3 | Lv. 3 |
| Normal | Normal |
| Money: 48 | |
.png)
Youngster Logan
| Youngster Logan |
|---|
| File:Shinx.png |
| Shinx ♂ |
| Lv. 5 |
| Electric |
| Money: 80 |
Events
Catching a Pokémon
After you told your Mum about your adventure, head to Route 202 and Dawn/Lucas will teach you how to catch a Pokémon. After that, he/she will give you 5 Poké Balls for free. You can now catch your favourite Pokémon and start collecting it to make a strong team!
First Trainer Encounter
You will encounter your first trainer at Route 202. You can avoid those trainers, but it is best to battle them to earn precious experience and cash.
Tips
Some Pokémon can be found in different time of the day. For example, on Route 202, Kricketot can only appeared in the morning and night. It does not appear in during the day. So if you want to catch the Kricketot, make sure you play during that time. You can also change the time on your Nintendo DS to catch it.
Quick Walkthrough
Route 202 → Jubilife City → Route 203 → Oreburgh Gate → Oreburgh City → Oreburgh Mine → ...
Template:Sinnoh