| (10 intermediate revisions by 7 users not shown) | |||
| Line 14: | Line 14: | ||
==History== |
==History== |
||
| − | [[File: |
+ | [[File:Giant Chasm Interior.jpg|thumb|right|200px|Kyurem in the deepest part of Giant Chasm]]It is stated that whoever enters the Chasm, surely disasters will follow. The residents from [[Lacunosa Town]] refer to it as the "hole" where a [[Kyurem|dangerous monster]] lives. |
==Pokemon== |
==Pokemon== |
||
| Line 32: | Line 32: | ||
*Metagross (Rustling Grass) |
*Metagross (Rustling Grass) |
||
*Ditto |
*Ditto |
||
| + | *Sneasel |
||
| − | *Sneasile |
||
===Inside Cave=== |
===Inside Cave=== |
||
| Line 80: | Line 80: | ||
When you come to the Giant Chasm in Black 2 and White 2, you will battle the following main Team Plasma Members. |
When you come to the Giant Chasm in Black 2 and White 2, you will battle the following main Team Plasma Members. |
||
| − | ====''On Plasma Frigate:''==== |
+ | ===='''''On Plasma Frigate:'''''==== |
;Team Plasma Colress (On Plasma Frigate) |
;Team Plasma Colress (On Plasma Frigate) |
||
{{Trainer |
{{Trainer |
||
| Line 139: | Line 139: | ||
'''Shadow Triad''' '''(On Plasma Frigate)''' |
'''Shadow Triad''' '''(On Plasma Frigate)''' |
||
| + | <tabber> |
||
| − | |||
| − | + | 1st Trainer= |
|
| − | |||
{{Trainer |
{{Trainer |
||
|NoP = 3 |
|NoP = 3 |
||
| Line 198: | Line 197: | ||
|ItmP5 = - |
|ItmP5 = - |
||
}} |
}} |
||
| + | |-| |
||
| − | |||
| − | + | 2nd Trainer= |
|
| − | |||
{{Trainer |
{{Trainer |
||
|NoP = 3 |
|NoP = 3 |
||
| Line 257: | Line 255: | ||
|ItmP5 = - |
|ItmP5 = - |
||
}} |
}} |
||
| + | |-| |
||
| − | |||
| − | + | 3rd Trainer= |
|
| − | |||
{{Trainer |
{{Trainer |
||
|NoP = 3 |
|NoP = 3 |
||
| Line 280: | Line 277: | ||
|LvP4 = |
|LvP4 = |
||
|LvP5 = |
|LvP5 = |
||
| − | |M1P1 = |
+ | |M1P1 = Faint Attack |
| − | |M1P2 = |
+ | |M1P2 = Shadow Claw |
| − | |M1P3 = |
+ | |M1P3 = Faint Attack |
|M1P4 = - |
|M1P4 = - |
||
|M1P5 = - |
|M1P5 = - |
||
| − | |M2P1 = |
+ | |M2P1 = Metal Claw |
| − | |M2P2 = |
+ | |M2P2 = Sucker Punch |
| − | |M2P3 = |
+ | |M2P3 = Metal Claw |
|M2P4 = - |
|M2P4 = - |
||
|M2P5 = - |
|M2P5 = - |
||
| − | |M3P1 = |
+ | |M3P1 = Slash |
| − | |M3P2 = |
+ | |M3P2 = Psychic |
| − | |M3P3 = |
+ | |M3P3 = Slash |
|M3P4 = - |
|M3P4 = - |
||
|M3P5 = - |
|M3P5 = - |
||
| − | |M4P1 = |
+ | |M4P1 = Scary Face |
| − | |M4P2 = - |
+ | |M4P2 = Will-O-Wisp |
| − | |M4P3 = |
+ | |M4P3 = Hone Claws |
|M4P4 = - |
|M4P4 = - |
||
|M4P5 = - |
|M4P5 = - |
||
| − | |GP1 = |
+ | |GP1 = ♂ |
| − | |GP2 = |
+ | |GP2 = ♂ |
| − | |GP3 = |
+ | |GP3 = ♂ |
| − | |GP4 = |
+ | |GP4 = |
| − | |GP5 = |
+ | |GP5 = |
| − | |AbiP1 = |
+ | |AbiP1 = Defiant |
| − | |AbiP2 = |
+ | |AbiP2 = Insomnia |
| − | |AbiP3 = |
+ | |AbiP3 = Inner Focus |
|AbiP4 = - |
|AbiP4 = - |
||
|AbiP5 = - |
|AbiP5 = - |
||
| Line 314: | Line 311: | ||
|ItmP3 = - |
|ItmP3 = - |
||
|ItmP4 = - |
|ItmP4 = - |
||
| − | |ItmP5 = - |
+ | |ItmP5 = -}} |
| + | </tabber> |
||
| − | }} |
||
| − | |||
| − | |||
| ⚫ | |||
| − | |||
| ⚫ | |||
| − | |||
| ⚫ | (Black Kyurem/White Kyurem cannot be captured because Ghetsis's "staff" when you first encounter it but when you |
||
| − | [[File:Kyurem-Black BW.gif|thumb|left]] |
||
| − | |||
| − | [[File:Kyurem-White BW.gif|thumb|left]] |
||
| − | |||
| ⚫ | |||
| − | |||
| − | Met at Lv. 55 |
||
| − | |||
| − | |||
| − | |||
| − | |||
| − | |||
| ⚫ | |||
| − | Met at Lv. 55 |
||
| ⚫ | |||
| ⚫ | |||
| + | ''' |
||
| ⚫ | (Black Kyurem/White Kyurem cannot be captured because Ghetsis's "staff" when you first encounter it but when you receive N's Zekrom (Black 2)/Reshiram (White 2), you can come back to the Giant Chasm and battle it again. When you come back, it will be at Lv. 70 in its normal form and to become Black Kyurem/White Kyurem, it will need to be combined with Zekrom/Reshiram by using an item called the DNA Splicers. |
||
| + | <tabber> |
||
| ⚫ | |||
| + | {{Template:Trainer |
||
| + | |NoP = 1 |
||
| + | |FileP1 = Kyurem-Black_BW.gif |
||
| + | |P1 = Black Kyurem |
||
| + | |T1P1 = Dragon |
||
| + | |T2P1 = Ice |
||
| + | |LvP1 = 55 |
||
| + | |AbiP1 = Teravolt |
||
| + | |M1P1 = [[Freeze Shock]] |
||
| + | |M2P1 = [[Fusion Bolt]] |
||
| + | |M3P1 = [[Dragon Breath]] |
||
| + | |M4P1 = [[Slash]]}} |
||
| + | |-| |
||
| ⚫ | |||
| + | {{Template:Trainer |
||
| + | |NoP = 1 |
||
| + | |FileP1 = Kyurem-White_BW.gif |
||
| + | |P1 = White Kyurem |
||
| + | |T1P1 = Dragon |
||
| + | |T2P1 = Ice |
||
| + | |LvP1 = 55 |
||
| + | |AbiP1 = Turboblaze |
||
| + | |M1P1 = [[Ice Burn]] |
||
| + | |M2P1 = [[Fusion Flare]] |
||
| + | |M3P1 = [[Dragon Breath]] |
||
| + | |M4P1 = [[Slash]]}} |
||
| + | </tabber> |
||
| Line 415: | Line 424: | ||
|ItmP6 = - |
|ItmP6 = - |
||
}} |
}} |
||
| + | [[Category:Caves]] |
||
| + | [[Category:Forests]] |
||
==Trivia== |
==Trivia== |
||
| Line 420: | Line 431: | ||
*Wild Pokémon in the plains are the highest level regular Pokémon found in Unova. They range from level 50-65. |
*Wild Pokémon in the plains are the highest level regular Pokémon found in Unova. They range from level 50-65. |
||
*It is said that disaster is said to befall trainers who approach the Giant Chasm, which may explain why [[Absol]] can be caught here. |
*It is said that disaster is said to befall trainers who approach the Giant Chasm, which may explain why [[Absol]] can be caught here. |
||
| + | *After catching[[N| N's]] [[Zekrom]] in B2 or [[Reshiram]] in W2, returning here will allow you to catch regular Kyurem and obtain the DNA splicers to fuse either Zekrom or Reshiram to Kyurem. |
||
{{Unova}} |
{{Unova}} |
||
[[Category:Caves]] |
[[Category:Caves]] |
||
Revision as of 16:53, 13 January 2014
The Giant Chasm is a location found in Unova where Kyurem can be found here as a level 75 deep inside. This area mainly specializes in having many Pokémon from the previous generations such as Tangela and Ditto. It is also famous for being the only place in the Unova region that houses Ditto.
History
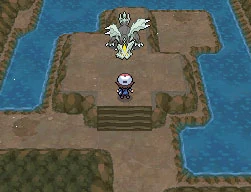

Kyurem in the deepest part of Giant Chasm
It is stated that whoever enters the Chasm, surely disasters will follow. The residents from Lacunosa Town refer to it as the "hole" where a dangerous monster lives.
Pokemon
Outside
- Tangela
- Swellow
- Golbat
- Solrock
- Lunatone
- Drifblim
- Absol
- Audino (Rustling Grass)
- Emolga (Rustling Grass)
- Crobat (Rustling Grass)
- Tangrowth (Rustling Grass)
- Mamoswine (Rustling Grass)
- Metagross (Rustling Grass)
- Ditto
- Sneasel
Inside Cave
- Piloswine
- Golbat
- Sneasel
- Delibird
- Solrock
- Lunatone
- Jynx
- Boldore
- Excadrill (Dust Cloud)
- Basculin
- Seel
- Dewgong (Rippling Water)
- Poliwag
- Poliwhirl
- Poliwrath (Rippling Water)
- Kyurem (Interaction in Inner Cave)
Plains
- Clefairy
- Piloswine
- Ditto
- Solrock
- Lunatone
- Metang
- Audino (Rustling Grass)
- Metagross (Rustling Grass)
- Clefable (Rustling Grass)
- Mamoswine (Rustling Grass)
Items
- Star Piece (x2)
- Comet Shard
- Max Elixir
- Max Potion
- Revive
- Carbos
- TM13 (Ice Beam)
- Full Heal
- Max Revive
- TM03 (Psyshock)
- Nugget
Black and White Versions 2
When you come to the Giant Chasm in Black 2 and White 2, you will battle the following main Team Plasma Members.
On Plasma Frigate:
- Team Plasma Colress (On Plasma Frigate)
 Magneton |
 Magnezone |
 Metang |
Beheeyem |
 Klinklang | |||||
| Lv. 50 | - | Lv. 50 | - | Lv. 50 | - | Lv. 50 | - | Lv. 52 | - |
| Ability: - | Ability: - | Ability: Clear Body | Ability: - | Ability: - | |||||
| Item: - | Item: - | Item: - | Item: - | ||||||
| - | - | - | - | - | |||||
| - | - | - | - | - | |||||
| - | - | - | - | - | |||||
| - | - | - | - | - | |||||
Shadow Triad (On Plasma Frigate)
Pawniard |
 Absol |
Pawniard
| |||
| Lv. 49 | - | Lv. 51 | - | Lv. 49 | -
|
| Ability: - | Ability: - | Ability: - | |||
| Item: - | Item: - | ||||
| - | - | - | |||
| - | - | - | |||
| - | - | - | |||
| - | - | - | |||


Inside the Giant Chasm Cave:
Defeat Black Kyurem (Black 2)/White Kyurem (White 2)
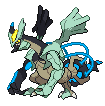
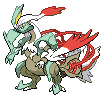
(Black Kyurem/White Kyurem cannot be captured because Ghetsis's "staff" when you first encounter it but when you receive N's Zekrom (Black 2)/Reshiram (White 2), you can come back to the Giant Chasm and battle it again. When you come back, it will be at Lv. 70 in its normal form and to become Black Kyurem/White Kyurem, it will need to be combined with Zekrom/Reshiram by using an item called the DNA Splicers.
Final Battle vs. Team Plasma Ghetsis
 Cofagrigus |
 Seismitoad |
 Eelektross |
 Drapion |
 Hydreigon |
 Toxicroak | ||||||
| Lv. 50 | - | Lv. 50 | - | Lv. 50 | - | Lv. 50 | - | Lv. 52 | - | Lv. 50 | - |
| Ability: - | Ability: - | Ability: - | Ability: - | Ability: - | Ability: - | ||||||
| Item: - | Item: - | Item: - | Item: Life Orb | Item: - | |||||||
| - | - | - | - | - | - | ||||||
| - | - | - | - | - | - | ||||||
| - | - | - | - | - | - | ||||||
| - | - | - | - | - | - | ||||||
Trivia
- This cave is very similar to the Cerulean Cave from Pokémon Red, Blue, Green, and Yellow versions, as it features very high leveled Pokémon and a very powerful Legendary Pokémon at the end.
- Wild Pokémon in the plains are the highest level regular Pokémon found in Unova. They range from level 50-65.
- It is said that disaster is said to befall trainers who approach the Giant Chasm, which may explain why Absol can be caught here.
- After catching N's Zekrom in B2 or Reshiram in W2, returning here will allow you to catch regular Kyurem and obtain the DNA splicers to fuse either Zekrom or Reshiram to Kyurem.
Template:Unova